Transforming your living space with unique, personalized wall décor is a great way to elevate your home’s aesthetic. DIY projects let you showcase your creativity while providing an affordable way to refresh and revitalize your surroundings. In this guide, we’ll share 10 simple yet stunning DIY wall décor ideas that anyone can try. Whether you’re an experienced crafter or just starting out, these projects will inspire you to design beautiful, meaningful pieces that make your walls truly stand out.
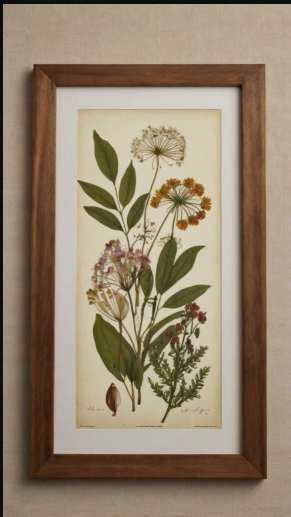
1. Framed Botanical Prints
Materials Needed
- Botanical prints or pressed flowers
- Picture frames
- Clear adhesive spray
- Scissors
- Cardstock or mounting board
Step-by-Step Guide
- Select Your Prints: Choose botanical prints or pressed flowers that complement your room’s color palette. You can purchase them online or from a local craft store.
- Prepare the Frame: Remove the glass and backing from the frame, then cut a piece of cardstock or mounting board to fit perfectly inside.
- Arrange the Prints: Lay out your chosen prints on the cardstock. Experiment with different arrangements—overlap them for depth or align them neatly for a clean, modern look.
- Secure the Prints: Apply clear adhesive spray to the back of each print and press it firmly onto the cardstock. Trim any excess edges with scissors for a polished finish.
- Assemble the Frame: Place your completed artwork into the frame, reinsert the glass, and secure the backing.
Tips
- Use frames of varying sizes and shapes to create an eye-catching gallery wall.
- Mix black-and-white prints with colored ones for added contrast and visual interest.
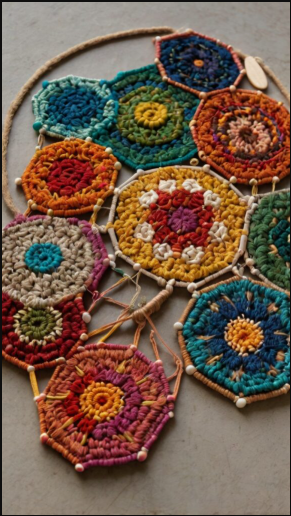
2. Geometric Wall Hanging
Materials Needed
- Wooden dowels
- Yarn or string
- Beads
- Scissors
- Glue
Step-by-Step Guide
- Create the Base: Cut a wooden dowel to your desired length—this will form the top bar of your wall hanging.
- Cut the Yarn: Measure and cut multiple strands of yarn or string, making each piece about twice the length of your intended wall hanging.
- Attach the Yarn: Fold each strand in half, loop it over the dowel, and pull the loose ends through the loop to secure it in place.
- Add Beads: Decorate your wall hanging by threading beads onto the yarn. Mix and match bead colors, sizes, and patterns for added visual interest.
- Trim the Ends: Once you’ve finished decorating, trim the yarn ends evenly for a clean, polished look.
Tips
- Experiment with various yarn textures, colors, and thicknesses to create a personalized design.
- Add tassels or small charms at the bottom for an extra touch of style and elegance.
3. Vintage Map Collage

Materials Needed
- Vintage maps or travel posters
- Picture frames
- Mod Podge
- Paintbrush
- Scissors
- Cardstock or mounting board
Step-by-Step Guide
- Select Your Maps: Choose vintage maps or travel posters that reflect your interests or favorite destinations. These can often be found at thrift shops, antique stores, or online.
- Cut the Maps: Trim the maps into smaller pieces or shapes. You can mix various sizes and designs for a creative collage or keep the pieces uniform for a clean, structured look.
- Prepare the Frame: Remove the glass and backing from your picture frame. Cut a piece of cardstock or mounting board to fit perfectly inside.
- Apply Mod Podge: Brush a thin layer of Mod Podge onto the cardstock, then arrange your map pieces on top. Overlap and layer them as desired to create depth and interest.
- Seal the Collage: Once your layout is complete, apply another thin layer of Mod Podge over the entire surface to seal and protect your design.
- Insert into Frame: Once dry, place the finished collage into the frame, reattach the glass, and secure the backing.
Tips
- Combine maps from different cities, countries, or continents for a travel-inspired theme.
- Enhance your collage with decorative touches like stickers, stamps, or painted accents for a personalized finish.
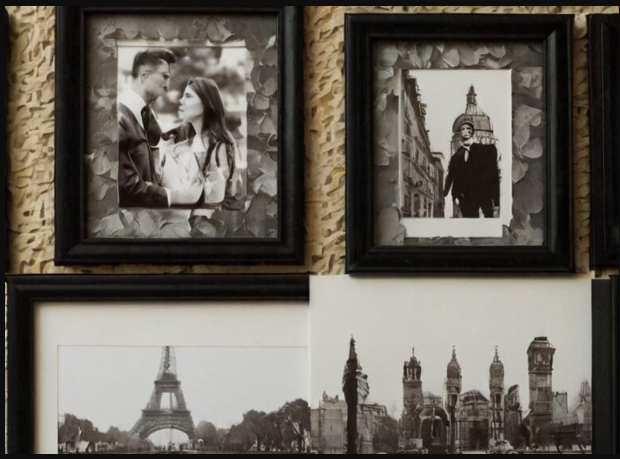
4. Photo Collage

Materials Needed
- Family or personal photos
- Picture frames
- Mod Podge
- Paintbrush
- Scissors
- Cardstock or mounting board
Step-by-Step Guide
- Select Your Photos: Pick meaningful photos—whether they’re family portraits, vacation snapshots, or candid moments—that you’d love to display.
- Print the Photos: Print your chosen images in the desired sizes. You can use a home printer or have them professionally printed for higher quality.
- Cut the Photos: Trim the photos into various shapes and sizes. For a modern, creative look, mix and overlap different cuts; for a cleaner aesthetic, keep the pieces uniform.
- Prepare the Frame: Remove the glass and backing from the picture frame. Cut a piece of cardstock or mounting board to fit snugly inside.
- Apply Mod Podge: Brush a thin, even layer of Mod Podge onto the cardstock. Arrange your photo pieces on top, overlapping or aligning them as desired.
- Seal the Collage: Once your layout is complete, apply another layer of Mod Podge over the surface to seal and protect your collage. Let it dry completely.
- Insert into Frame: Place the finished collage into the frame, reattach the glass, and secure the backing.
Tips
- Combine black-and-white photos with colored ones for visual contrast and depth.
- Add small decorative details—like stickers, washi tape, or brushstroke accents—to make your collage even more personal and artistic.
5. String Art

Materials Needed
- Wooden board
- Nails or push pins
- Hammer
- Embroidery floss or string
- Pencil
- Ruler
Step-by-Step Guide
- Choose a Design: Pick a design that suits your style—popular choices include geometric patterns, initials, hearts, or simple silhouettes.
- Mark the Board: Use a pencil and ruler to mark the placement of your nails or pins. Keep the spacing even for a neat, professional finish.
- Hammer the Nails: Carefully hammer the nails into the marked points, ensuring they are firmly in place but not driven too deep into the wood.
- Thread the String: Tie one end of your string or embroidery floss to a starting nail, then weave it around the other nails to form your design. Experiment with different colors or layering techniques for added visual interest.
- Secure the String: Once the design is complete, tie off the string at the final nail and trim any excess thread.
Tips
- Sketch your design on paper first to visualize the final layout.
- Mix thick and thin strings or different colors to create dimension and texture.
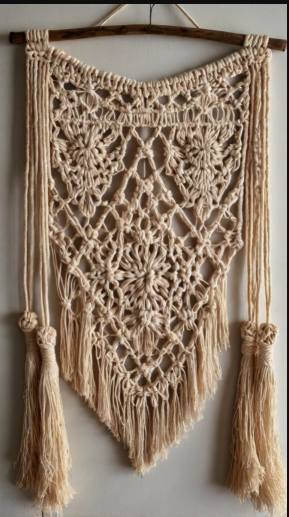
6. Macrame Wall Hanging
Materials Needed
- Macrame cord
- Wooden dowel
- Scissors
- Measuring tape
Step-by-Step Guide
- Cut the Cord: Measure and cut multiple strands of macrame cord to your desired length. The exact length will depend on how large you want your wall hanging to be—remember, it’s better to cut a little extra than too short.
- Attach the Cord: Fold each strand in half and loop it over the wooden dowel using a lark’s head knot. Pull the ends tight to secure each piece in place.
- Create the Knots: Use a combination of macrame knots to craft your design. Popular options include the square knot, spiral knot, and diagonal half hitch. Experiment with patterns to achieve your desired texture and look.
- Add Tassels: Once your main design is finished, attach tassels to the bottom for added texture and a polished, boho-inspired finish.
- Trim the Ends: Cut the ends of the cords evenly or in a decorative angle for a clean, professional appearance.
Tips
- Practice your knots on scrap pieces of cord before starting your main design.
- Combine different cord colors or thicknesses to add depth and personality to your wall hanging.
7. Wall-Mounted Bookshelf
Materials Needed
- Wooden boards
- Saw
- Sandpaper
- Paint or wood stain
- Drill
- Screws
- Wall anchors
Step-by-Step Guide
- Cut the Boards: Measure and cut the wooden boards to your desired size. You can use a hand saw or have them pre-cut at your local hardware store.
- Sand the Boards: Smooth out rough edges and surfaces with sandpaper to create a polished finish.
- Paint or Stain: Apply paint or wood stain to match your interior decor. Let the boards dry completely before proceeding.
- Drill Holes: Drill holes where the screws will go. If you’re mounting on drywall, use wall anchors for added stability.
- Mount the Shelves: Secure the shelves to the wall with screws, ensuring they’re level and firmly attached.
Tips
- Always use a level to ensure your shelves are straight.
- Decorate with small plants, candles, or vases to enhance the overall look.
8. Floating Shelves with Hidden LED Lights
Materials Needed
- Wooden boards
- Saw
- Sandpaper
- Paint or wood stain
- Drill
- Screws
- Wall anchors
- LED strip lights
- Power adapter
Step-by-Step Guide
- Cut the Boards: Measure and cut the wooden boards to your desired size. You can use a hand saw or have them pre-cut at a hardware store.
- Sand the Boards: Smooth out any rough edges or surfaces with sandpaper to ensure a clean finish.
- Paint or Stain: Apply paint or stain to match your room’s decor, then allow the boards to dry completely.
- Drill Holes: Drill holes for the screws and wall anchors. Use anchors for added stability, especially on drywall.
- Mount the Shelves: Secure the shelves to the wall with screws, making sure they are level and firmly attached.
- Install LED Lights: Attach the LED strip lights to the underside of the shelves. Connect the power adapter and plug it in to complete the setup.
Tips
- Use a level to make sure your shelves are straight.
- Add a dimmer switch for adjustable lighting and ambiance control.
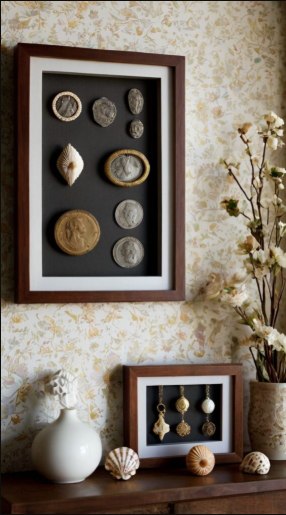
9. Shadow Box Art
Materials Needed
- Shadow box frames
- Decorative items (e.g., seashells, feathers, small figurines)
- Glue
- Scissors
- Paint (optional)
Step-by-Step Guide
- Select Your Items: Choose decorative objects that hold personal meaning or fit your desired theme—such as seashells, feathers, or small keepsakes.
- Prepare the Frame: Remove the backing from the shadow box. If you’d like, paint or decorate the inside to complement your room’s color scheme.
- Arrange the Items: Lay out your chosen items inside the frame until you’re happy with the composition. You can follow a specific theme or go for an eclectic, organic layout.
- Secure the Items: Use glue to firmly attach each item to the background. Allow the glue to dry completely.
- Insert the Backing: Once everything is set, reattach and secure the backing of the shadow box.
Tips
- Combine different textures, shapes, and colors for a visually interesting display.
- For added charm, install small LED lights inside the shadow box to highlight your decor pieces.
10. Recycled Art
Materials Needed
- Recycled materials (e.g., bottle caps, old keys, broken jewelry)
- Wooden board or canvas
- Glue
- Paint (optional)
Step-by-Step Guide
- Collect Your Materials: Gather a variety of recycled items such as bottle caps, old keys, or broken jewelry—anything that catches your eye and adds character.
- Prepare the Base: Choose a sturdy wooden board or canvas as your base. Paint it in a color that complements your decor, if desired, and let it dry completely.
- Arrange the Materials: Lay out your recycled items on the base to create your desired design. You can follow a specific theme or go for an abstract, eclectic arrangement.
- Secure the Materials: Once you’re happy with the layout, use glue to attach each piece firmly to the base. Allow sufficient drying time.
- Add Finishing Touches: Enhance your artwork by adding details such as a light coat of paint, metallic accents, or a layer of varnish for shine and durability.
Tips
- Combine different textures and colors for a distinctive, eye-catching design.
- Add personal touches like small photos, handwritten notes, or meaningful trinkets to make your art more sentimental.
Conclusion
DIY wall decor is a wonderful way to personalize your home and showcase your creativity. From framed botanical prints and geometric wall hangings to shadow box art and recycled material collages, the possibilities are endless. By exploring these 10 DIY wall decor ideas, you can turn your walls into a reflection of your personality and style. So gather your materials, unleash your imagination, and start crafting your way to a more beautiful, meaningful home.

